If you need to extrude your own
filament besides the extrusion machine, you will need to wind it nice
and untangled,
if you have tangled filament you will need to re-spool it untangled,
if you have brittle annealed filament
on a regular spool and keeps breaking in the Bowden tube, you need to
soften it two hours at 50C if PLA, 70C if ABS, HTPET or PETG, 100C if
Nylon etc, than in the same hot setup you need to re-spool it on a
200mm large core spool (yes, you might need to make one out of a
200MM diameter bit of PVC pile and some thin plywood for sides) than
leave it re-spooled another 2 hours at same temperature, than let it
cool slowly, than you can print with it alright.
Always print
with 100% infill, PLA is good for a machine used now and than at room
temperature, if your machine will stay or be used in hot environment
(like a shed under sun) use at least ABS or PETG (none of them too
resistant in time, like PLA) or Nylon (PolyAmide) or PPS.
This
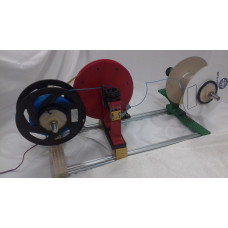
kit contains the following 3D printable items:
Level Winder
kit:
one twin left/right thread guide,
one path finder that will travel on that guide
one carrier for the path finder that also moves the filament left and right to avoid tangling on the spool
one stand leg (print two)
one stand base
one level winder breadboard base
one
pulley base diameter 100mm (to be fitted on the 8mm axis, it takes
all pulleys from 20mm diameter to 90 mm diameter)
Pulleys from 20 to 90mm diameter to be
fitted on the pulley base as needed
One pulley base diameter 220mm
(to be fitted on the 8 mm diameter axis, it takes the larger than 100
mm diameter pulleys)
one aligner to fit under the carrier
You
need to buy elsewhere: Inserts of metric 3 to put into the pulley
base 6 of them, one per each hole, metric 3 sunken head bolts various
lengths, stainless steel rod 8mm diameter that you need to cut at 150 mm and drill a hole diameter 3mm at 4 or 5 mm form one end
side to side to hold the bolt that locks the pulley, than when the
twin thread guide is printed, you drill through in the centre hole
with an 8mm diameter drill bit to clean the axis hole (those drill
bits are slightly less than 8mm, which is good, makes it a tight fit)
and than hammer through the axis hole the 8mm diameter rod such that
the end with the 3mm hole sticks out one side for 38/40mm.
You also need two stainless steel large
washers 8mm hole and 30mm outer diameter or whatever is near buy,
plus two 3mm bolts long 20mm for the aligner and 4 M4 bolts long 20
mm to bolt the legs onto the support, plus 4 M5 bolts long 25mm to
fit the assembly onto the breadboard support base.
After you
assembled the level winder and put the finder into the carrier, dry
run test it by hand while holding the finder down with one finger so
it does not pop out. If happy with the results that take a 3.5mm
drill bit and drill a hole in the side of it through the carrier side
opening, fit in an Allen key head bolt M3 with a nyloc nut to keep it
from flying out in operations.
Spooler kit;
One stand for roller axis
one
breadboard base
various pulleys
one centring cone without pulley
one
centring cone with 20mm short pulley
one centring cone with 50mm long
pulley
Various motor supports (Nema 17, Nema 23 and a couple of
others)
You need to buy elsewhere M6 studs long 300mm or more,
M16 nuts (be generous, you will use them a lot) M16 nylock nuts
(minimum 4) M16 wide washers (at least 8) interior diameter 16mm or
18mm “O” Rings (plumbing stuff) you will ned minimum 4 of them,
M4 nuts and bolts, M5 nuts and bolts.
2Bearings Outer Diameter
35mm, inner diameter 16mm, 11mm thickness (or near by)
each axis
takes two bearings they should be snug fit, zero play but not forced
in position, if you need to force them, better stop, take them out
and sandpaper work the hole around gently, and try again., once they
are in than take the 300mm threaded stud (may be even slightly
longer, but not shorter) and at one end fit a nylock nut until you
see a thread of the stud going out of the nylon lock, than tuck in a
washer, than one “O” Ring, than the pulley of your choice, than
another “O”Ring, than another washer than put the stud in from
the non flat side all way through to touch the bearing, at the other
end put in another washer, than a nylock nut, and while holding the
stud with a clamp somewhere thread that nut into the system until the
washer grips onto the bearings a bit, just enough to have zero play
without stopping the bearings from twisting, and test if the pulley
has a nice grip solid with the axis, if not, close a bit more the
nuts, like a quarter of a turn. Now is ready to fit cones and align
with other elements like the motor pulley, the level winder pulley
and the level winder filament path (trial and error till it works)
As transmission belts I am using some Kitchen elastics, wide
10 mm or more, thick at least 2 mm and at least 100 mm long when
measured flat (technically they are 200 mm around the circumference)
but have at hand also shorter and longer versions. They are cheap,
easy to replace and have a good grip.
You need Structural
Silicone (also known as sealant glue) to spread onto the cones
surface and their grip channel on the back, and let it dry a few days
before using it, that is to give a grip to the cones on the
spools.
Some pulleys you will note have some outer obstacles
around, you can use them as they are or cover the pulley with
structural silicone until the outer obstacles are covered by a mm or
two making your pulley a rubberised one, let it cure a few days
before using it.
level winder and spooler kit for filament 1.75 mm for 1 Kg spool
- Brand: 3D Mential
- Product Code: level winder spooler kit filament 1.75 mm 1 Kg spool
- Availability: In Stock
-
£7.00
- Ex Tax: £7.00
Related Products
Filament accumulator kit
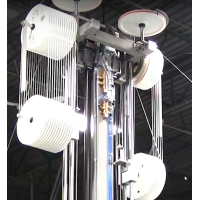
The production of 3D printer filament is hindered by a few major limitations, one being the requirement of uninterrupted filament extrusion without any changes in temperature, speed, or pulling tensioner. To address this, an accumulation buffer mechanism is needed to store the produced filament ..
£5.00 Ex Tax: £5.00
Tags: level winder, spooler kit, filament, 1.75 mm, 3 Kg spool, save the planet, climate change, plastic, reuse, recycle, recycling, repurpose, make your own filament, extrude filament, recuperate plastic, clean the environment.


